Monday, 15 July 2013

A Real Quilt for Max

It's finished! My first ever full-sized quilt. Full of imperfections, but I love it, and I hope Max does too. I'm looking forward to giving it to him on his 5th birthday.

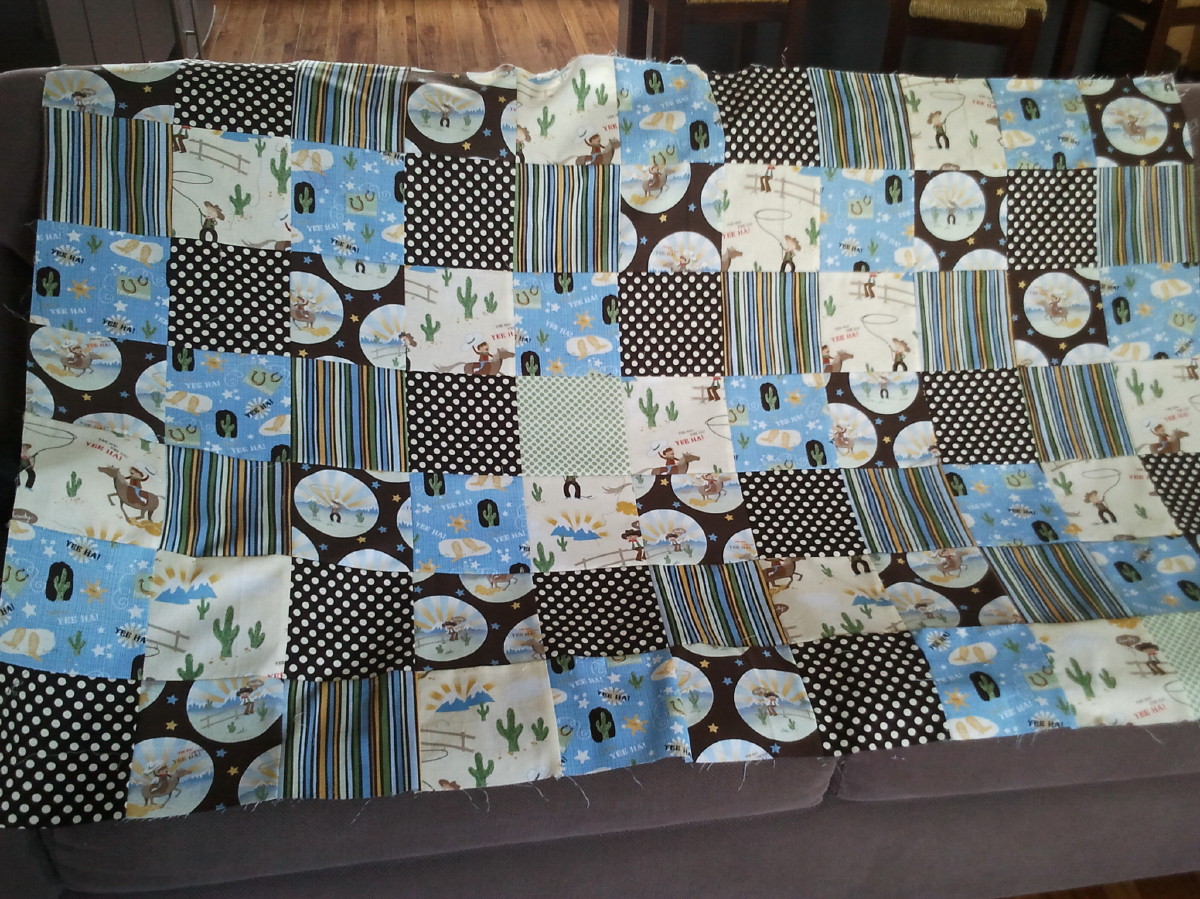
Now that was a journey - not at all like doing his lap quilt. It took about 7 months, 5 of which it was sitting idly while I decided what to do about the less-than-perfect stitching from my not realising that my sewing machine tension actually went higher than 5 (in my defence, the marks between the numbers abruptly stop and the wheel becomes quite stiff to turn. I thought that 5 was all it went up to). After deciding to and then working myself up to unpicking a quarter of the quilting, I plunged into it and managed to finish that and the whole thing quite quickly, well in time for his birthday.

I spent so long making the quilt top perfect - the squares were lovely and uniform, pieced in perfect straight lines, the quilt sandwich was lovely and flat and I used tons of pins, but it all turned to custard when quilting. Although it turned out much better with the tension set on 8 (not 5!), I still had troubles with uneven stitches and bunching at the ends of each square - I used a walking foot, but it was a super cheap one from a Chinese Ebay merchant, and to be honest, it didn't really look like it was doing anything, so I'm thinking the quality was a bit shonky, that and my machine is only an entry-level model, not made for such big projects (and is in desperate need of a service). The binding was an interesting affair - I have never bound anything before - I had a very limited amount of fabric left over for it, so the strips were only 2in wide - I would have preferred them to be at least 2.5in, but it worked out anyway. After reading a gazillion posts on binding, I decided to use a cross grain binding and to do the entire thing on the machine - none of this hand stitching for me - I'm far too impatient!

I'm so thankful to the person who advised that I should perhaps start with a single quilt, before throwing myself into a king!


Tuesday, 15 January 2013

A Cowboy Quilt

So, in my new obsession with quilting I want to do EVERYTHING! I am SOOO excited about it! I have found so many different quilts and objects I want to sew. I absolutely want to do a rag quilt for our bed and have already started on the planning, but then thought I'd better start with something a bit smaller than a king-sized quilt, and I came across some super-cute cowboy fabric at the Spotlight sale...perfect for a 4-year-old boy's single bed!

Let me share my working out, so that it might save somebody else all the calculations I made. We use the metric system in NZ, however, since many of the quilting tutorials I've been reading are written using the imperial system, I have had to work out everything in both centimetres and inches. (Oh and just for fun, choose the odd one out: Liberia, Somalia, USA, Burma (aka Myanmar). See answer below.


So I wanted to make a simple square patchwork single quilt (that's approximately a "twin" for those in the US). Our single beds measure 92cm x 188cm (36" x 74") and I chose to make a quilt 60.5" x 75" - long enough to drape at end of bed once in position below the pillow- that works out to be 11 x 14  5.5" squares. Once the 1/4 inch seam allowance is added, you need 6 inch squares -154 of them! 


 Brown polka dot squares still to be cut.


Half finished quilt top. 

I am thinking I want to bind it in the brown polka dot fabric and since I have never bound anything before, I have been watching loads of videos on cutting continuous bias binding and binding quilts. I'm still a bit nervous about it. I still also need to make a pillowcase, but don't have a lot of fabric left, so it will need to be pieced together.

But anyway, it's progressing and I'm quite excited about it.

More later!


Oh, and the odd one out of Liberia, Somalia, USA, Burma is:
Somalia - the other 3 are the only 3 countries in the world to still officially use the imperial system!


Sunday, 13 January 2013

Quilting: A Change of Heart

I had NEVER been interested in quilting. For me, the word conjured up images like this:


Fussy, green, maroon and brown geometric nana-quilts.


However, recently I stumbled across the photos below and immediately fell in love with rag quilts.


After trawling through quilts on Pinterest, I discovered that quilts can be amazingly beautiful!
Some of my favourites are:

http://www.etsy.com/listing/114724021/modern-patchwork-quilt

I'm loving the square look and I really like the yellow squares in the middle of each block to pull it all together. Great fabric from Lotta Jansdotter.


ididntsaybanana.blogspot.com

Pinwheels in super cute colours as a baby quilt. Preeeetttty.


http://www.magpiequilts.com/2012/02/chevron-quilts.html

Mmmmm...Chevrons!


I have made a few baby quilts/lap quilts, but never a full-sized one, nor one with anything other than patchwork squares. See two of my little quilts here and here.

But now, some days it seems all I do is think about quilts and quilting. Strange how this obsession snuck on me. I even have a Quilt board on Pinterest!

After first seeing the above rag quilts I decided I want to make a king-size one for our bed and spent hours calculating sizes of block and how many fabrics I'd use and how much I'd need. I ordered some spring-loaded snips, a walking foot for my machine, spent ages scrolling through pages and pages of fabrics trying to decide what to use. (I think I have found the colour story I want to use, but more about that later.)

After such a burst of enthusiasm I then stopped to think and decided, prudently, I believe, that I should start with a smaller project. I have now started a single quilt for Max's bed. More about that soon.

And now, back to my sewing machine!

Friday, 30 November 2012

Christmas Calendars 2012

Finished and hung, ready for tomorrow. Hurrah!

(And for those of you who want to know what is in this year's calendars, read this post)


Thursday, 29 November 2012

Xmas is still coming!

Still working on the Calendars - realised today, with 1 day to go until they need to be hung, ready for Saturday morning, that I forgot to get stamps for the numbers.

Flashback to Kindy: cutting up potatoes to make shape stamps...

I wonder....


Yay! Saved the day. It wasn't so easy cutting them with needy child clinging to leg, but they're close enough -  they're for a 4 and a 2 year old, they won't notice.


Speaking of presents for a 4 and a 2 year old, their main presents, that I have been working on for the past few weeks, are coming along nicely.


They still need to have their bridles sewn down to stop them from sliding up the nose (see horse), I have some bells to sew on the sides, and of course, I still need to attach them to the sticks (which I won’t do until just before Xmas, as it makes them so much harder to hide!)  I'm so excited about seeing the boys' faces when they find these under the tree!


UPDATE - Here are the finished beasts on their sticks!:


Thursday, 15 November 2012

A Birthday Present for Finn


In the mornings the boys love snuggling on the couch under blankets - we all have our own TV blankets - I made Max one last year and Andy and I have our own. Finn is now old enough to have his own, I hope they'll stop squabbling over who is using whose! This came from a super-duper easy-peasy tutorial from Cat Taylor Design. How fabulous is that navy and white shark fabric?


Saturday, 3 November 2012

Xmas is coming...

Which means it's time to start organising and putting together Christmas Calendars for my two little lads. As I said last year, we always had calendars when we were little, and they are for me one of the most memorable things about Christmas when I was young.

Finding 24 little presents is probably a whole lot easier these days, compared to back when Mum was making them, with $2 shops popping up in every group of shops. However, it is still a challenge finding age-appropriate gifts, things that aren't wasteful - toxic plastic toys that break within half an hour - and toys that will be enjoyed and played with more than once. I also look for packs that can be separated, as even at the $2 shop it's pretty easy to rack up a big bill when buying 40 or so little presents!

This year I decided to supplement the little toys with activities - for each I made a card or a ticket to represent what it is we are going to do. Because of this I had to think a little more carefully about what goes on what date, making sure that activities fall on weekends or non-kindy days.

Since I had a number of people ask last year what was in all the packages, I have taken photos and written a list - but don't tell the kids!


Top row is for Max, bottom for Finn. There are only a few days when they get different presents.

From left to right, the 1st - 24th Dec:

1. Picture of Father Christmas from here, along with cotton balls to stick on his beard each day.


2. Activity: Visit Father Christmas in the Enchanted Forest (for a Santa photo)
3. Chocolate coin
4. Farm animals
5. Bubble mixture
6. M: Homemade learn-to-make-pompoms kit/F: Money box (Finn McMissile)
7. Sheriff badges
8. 5x 10c coins to put in money boxes

9. Activity: Go out for ice cream ($2 taped to pic of ice cream)


10. Chocolate coin
11. Balloons
12. Farm animals
13. Candy cane
14. Stickers
15. Farm animals
16. Activity: Pic of goose - off to feed the ducks/geese/swans.
17: M: Paint a Santa ornament/F: bubble mixture

18: Activity: Bake Christmas biscuits (Christmas cookie cutter)


19: Chocolate coins
20: Glowsticks
21: Police badge

22: Activity: Visit to Transport Museum


23: Stickers
24: Candy cane

All wrapped up they look like this:


All that's left to do is make the calendar!